
DIY Hero Uniform T-Shirt Part 1
- Raven

- 5 hours ago
- 4 min read
Uniforms can get expensive. If you are starting out or don't have a lot of cash to spend on a uniform, you may appreciate this guide. The great thing about a uniform t-shirt is that it's custom, it's fairly cheap, you can always layer if it's cool outside, and it will suffice until you decide to upgrade.
It does require use of a sewing machine and a little design work. Below is a t-shirt template that you can print out. Do some mock ups until you figure out what your uniform t-shirt should look like. Limit your colors to 1-3 only.


Left to Right: Hawkeye, Red Hood, Bishop, Superboy. They all wear t-shirts as part of their uniform...very fitted t-shirts. (And, please, you can't tell me that Bishop puts on a unitard.)
I have 3 sewing techniques to share with you, plus some ideas for accents. First off, lets talk about t-shirt fabric. If you were to make cuts into a t-shirt, then wash it, the fabric will curl on itself. This can be useful for a number of decorative things. Just keep that in mind when you're doing your sewing. It's also a good idea to make sure you get the same type of t-shirts - same brand, same type. These two t-shirts are Bella+Canvas tri-blend t-shirts. You might prefer a heavy weight t-shirt or a cotton or poly or 50/50 blend.

Section Replacement - If you decide that you want different colored sleeves, you can easily do a section replacement. You'll need a seam ripper and appropriately colored thread. Use the seam ripper to cut through the sleeve seam at the shoulder (DO NOT CUT IT WITH SCISSORS) of both shirts. Once both sleeves are removed, pin the replacement sleeve with sewing pins. It helps to line up the seams at the armpit first. Prepare your sewing machine. We're going to do a straight stitch and a second zigzag. The zigzag will help reinforce the seam. The straight stitch will act as the main seam line.


Finished replacing the sleeve on this t-shirt.
Applique - This technique is where you take a shape, place it on top of the shirt, and stitch around it. On a piece of paper, sketch out the shape you want. Make it as perfect as you can. Once its ready to go, cut out that shape in the color you want. Line it up on the t-shirt with where you want it to be placed. You may need to put the t-shirt on and do this part in the mirror - use chalk or a pencil to make some placement marks. Pin it in place. All you need is a straight stitch around the edges to keep it in place, but you can also use other stitches around the edges for different effects.


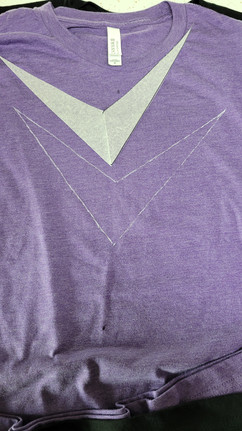


After tacking this V shape down with a straight stitch, I went back over it with a tight zigzag to kind of look like an embroidery outline. It will help create a nice border and prevent any sides from rolling.
Reverse Applique - This is similar to the the applique, only you're placing the additional color underneath the t-shirt, instead of on the top. If your design features slashes, I would totally recommend this technique. Use a piece of chalk or a pencil to mark where you want to make cuts on the t-shirt. Use a piece of tracing paper (or even parchment paper) to trace a shape around the mark with about an 1" clearance. It doesn't have to be super pretty. For the basic attachment, we're going to use a straight stitch. Pin the shape on the underside of the t-shirt. Use your chalk or pencil to make a line about 1/4" from the edge of your shape. This is just a guide for you to follow as you make a straight stitch around the shape (yes, you'll sew it from the reverse side). When you're done, turn the t-shirt to the regular side. You can either put a finishing edge around the shape you're going to make or you can put a loose edge around it to allow the top shirt to roll back some (looks cool for slash marks).


The reverse applique does take a little extra time because you have to make sure you get it pinned in the right place. One of the key things is to use the right color thread - which won't be noticed when you wear it. As you can see, I put some additional straight stitching around the slash marks before cutting them. This will help keep things in place, but still allow the fabric to roll after a wash.
Accents
Why stop with sewing some stuff to a t-shirt? We can add a bunch of other things to a t-shirt to customize it. I'm going to go over 4 accents (fringe, studs, paint, and iron-on) that you might want to consider when creating a uniform t-shirt. LOOK FOR PART 2 for the last two accent techniques!
Fringe - If you are interested in t-shirt fringe, you basically just have to use chalk to mark where you want to cut. Break out the ruler and get to marking. Make each fringe strip 1/2" wide. You may want to mark the 'stop cut' area so your fringe is even or in a particular shape. Simply wash and dry for a curled fringe effect.


Studs - Studs are lightweight metal pieces with prongs on the backside. Check out Studs & Spikes for shopping (listed under Resources). Spikes, which you want to avoid on a t-shirt, have a screw back and are made for heavier materials. Studs are cool because they come in various shapes, sizes, and colors. You can poke the prongs through the t-shirt material and use a screwdriver or pencil or metal nail file to press, securing them. They'll survive in the wash.


These are 1/2" pyramid studs. You might want to go a little smaller if you think these look a little big.
Fabric paint and Iron-on will be featured in the next post!
Demographics Survey - On an entire other note, if you are an RLSH, please take a moment to fill out this RLSH 2026 Demographics Survey. It's anonymous. Just looking to gather some general information to study. It will end up becoming an article after the end of the year.
If there is something you would like to see me discuss here on Herocore, please feel free to contact me. raven@herocore.online


Comments